What the Hell is On YOUR Face? is a little thing I’d love to do from time to time that describes the beauty routines of those I know and love. I demand that they let me play with their products, and then you get to read about many more beauty things than if I were to do it alone.
Wow, a new category of What the Hell is On My Face? Great day! I’m incredibly excited about this because I’ve actually wanted to do it since it started – it was a main component of this blog for awhile. Many Beauty Brains are better than just one Beauty Brain alone, and not only will this piece bring more products to the metaphorical table, I hope it also gives insight into the infinite possibilities for a “beauty regimen” or “skin care routine” or whatever. Meaning, I have a lot of gorgeous friends (all of my friends are gorgeous, in fact), and they range from “only wearing makeup when their mom made them in seventh grade for their brother’s graduation,” to “a quick swipe of mascara alone turns me into a sex goddess,” to “I wear full coverage foundation with a Kardashian level contour to the gym.” Most people I think are either somewhat in between these levels, and 100% of people have been at all three at some point in their life.
The VERY! FIRST! What the Hell is On YOUR Face? consists of diving into the makeup routine of my friend Rachel. Rachel is a PhD (DEAL WITH IT), has worked her ass off for two hundred years, gettin’ it done. She works harder than the vast majority of people, has kept her eye on the ball and has made countless sacrifices to do for herself what she deserves. I admire the shit out of her, and hope I someday get an ounce of the tenacity and grit she has.
Also, after gazing through her photos for hours in writing this, I’m pretty convinced she’s a land mermaid.

First up in Rachel’s daily makeup routine is a Kat Von D Lock-It Concealer (currently on sale for $15, down from $25! I may snatch some up for myself).
Says Rachel:
I really like that it’s super light and that it moves to powder really fast. So it doesn’t sit heavily under my eyes and sink into my creases. It also isn’t sticky. With a concealer, you don’t want it to be too dry because then if you put a foundation over it, it won’t layer. But you also don’t want it to be too moist – glossy? – dewy! Because then it’ll go into your creases. This manages to be really light while still being full coverage, so it covers my crazy circles. And, it’s got just enough yellow in it that I can put it over my zits too.
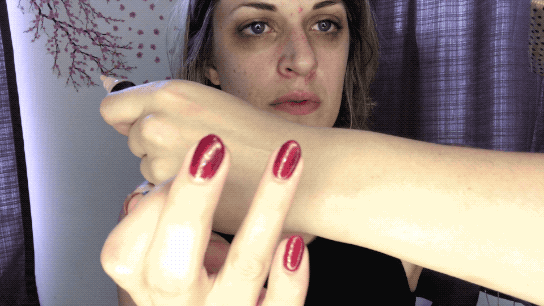
Let’s see how it covers those “crazy circles.”

The “going to powder” aspect of this is what’s making me want to whip out my credit card (okay, let’s be honest, my debit card) and snatch up a bottle of this. Here’s Rachel after one eye was covered:

I can’t get over how wonderfully this shade matches her skin. The transition from under her eye to her cheek is almost seamless.
After her concealer, Rachel moves on to a BB Cream. A BB Cream girl! Woo-hoo! We should’ve totally discussed BB Cream as a crucial in-between step when one is getting over their foundation addiction, but alas, it slipped my mind. The BB Cream Rachel is into is Dr. Jart+ Premium Beauty Balm SPF 45. Yes, you read that right: SPF 45. That’s a pretty phenomenal level of sun protection, even for a BB Cream for which that’s a main draw.

Here’s how this beauty balm blends beautifully. Ahem.
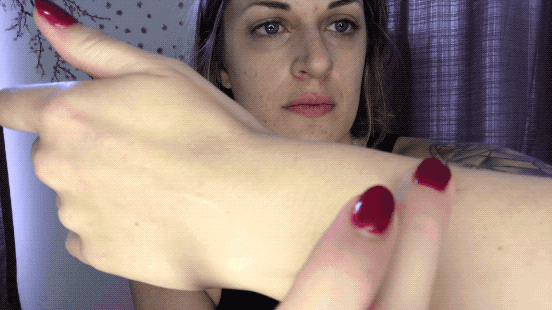
As you can see, it’s pretty creamy; I actually diverged with Rachel over this product (don’t worry, I think we’re still friends), as it was way too creamy for me. However, that sun protection is a huge, great factor, as well as the fact that it blends so well on her skin tone. I think if you need that SPF, it’s worth testing it out at the store to see if you can find a shade that fits, even if you don’t use it every day. Here’s Rachel’s take:
Dr. Jart do a ton of sheet masks, and that’s how I first heard about them. I’ve always liked a lighter foundation – not a full foundation – something that’s one step above a tinted moisturizer. I can’t quite do a tinted moisturizer because my skin gets so blotchy underneath my circles. Most people have bigger pores right on that bump between your eye bone and your nose, myself included, and that’s where I get splotches, so I’m always looking for something that’s going to do a little more full coverage but it’s not going to feel heavy on my face. Also, tinted moisturizers typically only have an SPF of 15, so 45 is awwweeessssooommme.
It layers pretty well, so if I really want more full coverage, I’ll just put on a second layer. It is pretty creamy, so I use a powder over top.
Let’s watch an application, shall we?
Side note from moi, Katie: I’ve noticed that the creamier something is, the more it destroys my brushes, especially if it contains a high SPF, so I’m all for hand-application with a product like this. Yeah, yeah, people are all clutching their pearls right now, but just wash your hands first and who cares? Also, I find that using a brush with a creamy product actually forces the product more into fine lines, making them look worse. Patting something thick on – as you would a moisturizer/eye cream – is going to give you better coverage.
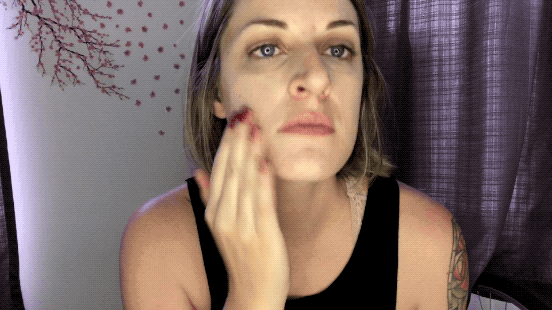
And then you get results like these:
The next step – the powder Rachel mentioned when discussing the BB Cream – was actually a moment of revelation when we realized we both used the same brand, Laura Mercier. Rachel, however, uses the invisible version; I use the translucent. Here we are with our respective powders, because again, we’re just incredibly cute.

You can already see in this photo how Rachel’s has the more white/clear sheen while mine has more of a yellow tint to it. To be completely fair, I just grabbed the setting powder that had the best reviews, and I don’t think the invisible one was available when I got mine. I can tell you, a little goes a long way, and it’s worth the investment, because it absolutely works. The splotchiness Rachel mentioned earlier doesn’t happen with this stuff. It also just feels good on your face, especially as you’re applying it. I may go for the invisible version when I run out of mine. Says Rachel:
I like that it’s so light. It just sits, but also it sucks up the moisture from the foundation underneath it. What sold me on it was that in Sephora, I just rubbed a little bit on my arm, and it’s just so satiny right away. And that’s how it feels on your face all day. I switched to this from the hourglass pressed powder, which had the same lightness, but because it was a pressed powder, I always felt like I was fighting against the product to get it out of the container. So I feel like maybe loose powder gets a bad rap these days as being “too vintage” or “too 60s” or “too fussy,” but I really prefer loose powder because I can get it onto the brush easily, I can control how much of it is on the brush, and then I can really easily pat off any extra with a Kleenex.
Actually, I’ll take the damp towel that was on my hair and pat my face with it after I use the powder, to take off any extra.
Let me just take a minute to reiterate how fun it is to talk setting powders with one of your buddies. I mean, I still haven’t found another murderino among my friend group, but honestly it’s becoming less important as I discover how many of my squad are willing to bullshit about concealer texture for hours.
Moving on, this is us putting on setting powder, which isn’t particularly necessary, but again, we’re all just trying to have a good time in this crazy, fucked-up world.

I’ve already mentioned the blue, blue, blue-green, turquoise-y exquisiteness that is Rachel’s eye color, she would be insane not to highlight those peepers in order to ensnare the attention of every passer-by, and thus come many steps closer to overtaking the world. First, she uses NYX Eyebrow PushUp Bra. (And yes, that store, Ricky’s, is now selling this pencil for ONE DOLLAR, down from $10; NYX is also in Targets and whatnot, but it’s a DOLLAR here. Ricky’s, btw, is an NYC staple of mostly hair stuff, but also beauty as well as – yep – insane Halloween costumes. It’s one stop shopping for insanity and fun.)
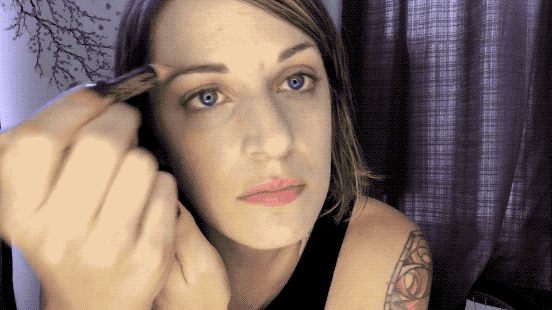
Rachel and I had a brief discussion about eyebrow gels and our preference for pencils.
Rachel: I can’t use [a gel] every day because it’s so hard to get out of my eyebrows.
Me: I feel like they’re just too messy for me, I can’t find that adjustment between too much and too little; I always put too much.
Pencils, all the way down!
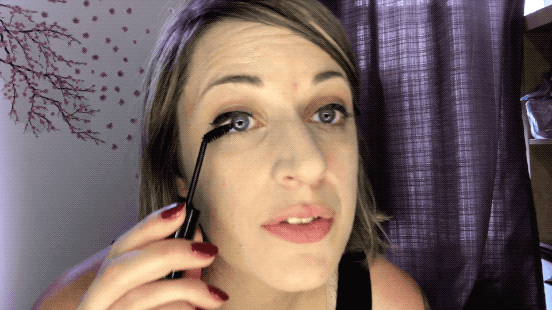
After a good brow deepening with the pencil, Rachel uses Clinque Liquid Eyeliner with one of the most exxtreeemmeeelly pointy tips I’ve ever seen in a liquid liner.

That thing’ll stab you in the neck and not call you for weeks. Obviously, the sharper the tip, the easier it is to use, and here’s Rachel applying it.

Always remember, if you haven’t used a liquid before, that there is a huge learning curve. When I first started using a liquid eyeliner, I basically just would do it when I knew I wasn’t going anywhere. It takes practice, and while they’re getting better and better in terms of how precise/thing/stabby the brushes are, you’re not an idiot for not doing it perfectly the first time. In fact, it’s well-known that achieving a perfect cat eye with liquid eyeliner the first time it’s ever attempted is definitive proof that you’re a witch.
Liquid eyeliners, I’ve found they expire really quickly. So after using it for two months it starts to flake and leave you with raccoon eyes in the middle of the day. This one I’ve been using – this single one – for four months now. It doesn’t flake, it doesn’t gap, it still gives a nice, clean line, and it doesn’t give me styes. I line really heavily around my tear ducts, and I’ll get styes if I use something that is too formulated. The hypoallergenic aspect of this really comes through.
The thing that I don’t like about it is that the brush frays. I like this brush, but every so often, the pieces will bend back and I can’t get them to live back in the brush. So I have to position it in a very specific way, with those pieces pointing away so I can get the liner clean on my eye.
And, of course, after eyeliner comes its inevitable sister mascara. Rachel goes for a total classic, Maybelline Great Lash, and informed me (I can’t believe I didn’t know this!) of its popularity among makeup artists as a total, effective classic. However, because Rachel is magic, she’s has a special trick for getting the most plumpiest lashes ever.

When I first get it, I take it out just to a certain point, and I tweak the end so it’s an L-shape. So it’s like a hockey puck – a hockey . . . shaped thing? Sports?
It’s lucky that she was referring to the only sport I know even a bit about besides baseball (a hockey stick, which it does look exactly like). And look! At what! Happens! When! You do! THIS!
Plumpity plumpity plump! I love this so much, I’m buying the mascara AND bending it ASAP. I mean, it helps that Rachel has some great lashes going for her, but this is just such a simple, easy trick, and with a drug store brand product no less. I love this because the angle your arm and hand are now using means you’re less likely to get the mascara under your eye. I have small eyes, so that’s constantly an issue; I push too hard from underneath and next thing I know: mascara on my eyelid. I think this would give me way more control.
Now, for my favorite part of this whole thing: I GOT A PRESENT! Rachel, in her generosity, gave me a special lipstick I admired the last time she visited: Smashbox Always On Liquid Lipstick. However, since this particular piece is getting a bit long, I’m going to separate it into a new part. So take a moment, absorb all of the wisdom Rachel’s beauty routine has bestowed upon you, maybe get a glass of water as you consider all of your new makeup and BB Cream and mascara possibilities, before moving on to Part 2 . . .

2 Comments Add yours